
Thinking of doing your own resin driveway? With the right info and supplies, you can make a stunning, durable resin driveway that increases both your home’s look and its functionality. This article looks at how to do this, including the steps and things to consider.
Before starting, plan and prepare the area. Look at where the driveway will go and make sure it’s perfect for resin. This includes clearing any mess or plants, making the ground even, and dealing with any drainage problems.
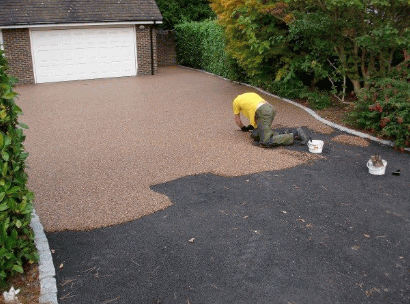
After that, apply a primer or sealer. This bonds the resin and the base, preventing cracking or lifting later. Then spread a mix of resin and aggregate on the prepared surface. Use special tools to make it smooth.
Understanding Resin Driveways
Resin Driveways are unique and need understanding. Polyurethane and epoxy are the two types, each with its own benefits. Polyurethane is flexible and UV-resistant. Epoxy provides high-gloss and chemical resistance.
Preparation is key: Remove any asphalt or concrete, fix cracks, then create a stable base.
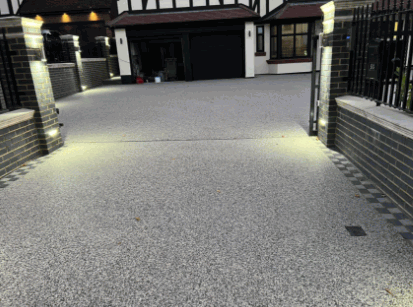
Resin Driveways provide an aesthetically pleasing and low-maintenance option. Hire professionals or take on the challenge yourself to enhance the look of your property.
Benefits Of DIY Resin Driveways
DIY resin driveways offer several perks for your home’s exterior. Here are the top benefits:
- Cost-effective solution: Save money by doing the project yourself and avoiding professional contractors.
- Customization options: You have the freedom to choose from various colors and finishes.
- Durability and low maintenance: These driveways can withstand heavy vehicle traffic and require minimal upkeep.
Plus, you have control over the design process. Try different patterns and textures to make a unique driveway.
To ensure success, follow a few tips:
- Prepare the surface by cleaning it and fixing any cracks or potholes.
- Use a primer before applying the resin to enhance its bond.
- Follow the manufacturer’s instructions for mixing ratios and application techniques.
Remember to prioritize safety by wearing protective gear such as gloves and goggles. If you do, you can create a professional-looking DIY resin driveway with satisfaction.
Explore Further: Revamp Your Home’s Exterior With Resin Driveways
Tools And Materials Needed For DIY Resin Driveway
Which tools and materials are needed for a DIY resin driveway? It’s essential to know before starting the project. Here are the necessary items:
- Resin binder: This binds the aggregate and makes the driveway strong and stable.
- Aggregate: Choose the one that’s compatible with resin binder and can handle heavy traffic.
- Roller: This tool ensures the resin mixture is spread evenly.
- Trowel: To level any unevenness while applying the resin mixture.
- Protective gear: Safety first! Wear gloves, safety goggles, and a face mask.
In addition, consider these items for a successful project outcome:
- Measuring cups/containers: For accurate measurements and material distribution.
- Pressure washer/stiff brush: To prepare the surface by eliminating dirt, debris, and loose particles.
- Pigment additives: For color customization.
- Edge restraints: Prevents the spreading of the resin mixture beyond its intended area.
Pay attention to detail and prioritize safety. You can have a professional-looking and durable resin driveway.
Step-By-Step Guide To DIY Resin Driveway Installation
To achieve the same outcome, one must follow these steps:
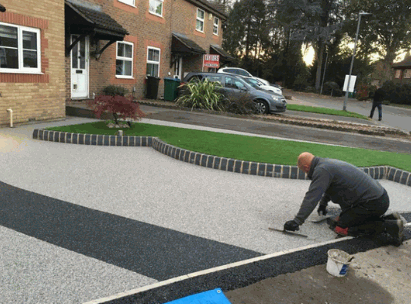
- Prepare the area: Clear the space and remove all debris. Excavate the ground to a depth of 200mm and compact it. Install a geotextile membrane.
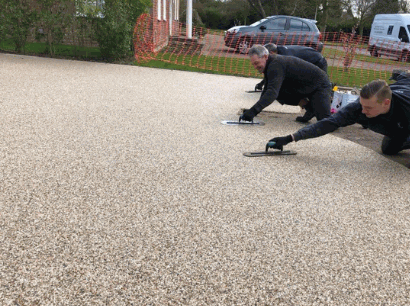
- Mix and apply the resin: Mix the resin according to the manufacturer’s instructions. Pour the resin and spread it evenly.
- Add decorative aggregates: Sprinkle the decorative aggregates and press them into the resin.
- Allow to cure: Allow the resin to cure for 24 hours before use.
Maintenance And Care Tips For DIY Resin Driveway
Make sure your DIY resin driveway remains in great shape by adhering to these maintenance and care tips!
- Regular cleaning is key; sweep away debris and dirt, then use a mild detergent and water to remove stains.
- Avoid parking big vehicles or using heavy machinery as they can damage the surface.
- Be aware of potential chemical damage – like discoloration or erosion – that might occur from strong solvents or petroleum-based products.
- Wipe up spills quickly!
- Reseal the surface every few years and repair cracks immediately.
- For added durability, apply a UV protector regularly.
- Resin driveways are also often more eco-friendly, needing less water for cleaning than traditional alternatives.
Don’t forget to follow these tips for a beautiful and long-lasting driveway!
Common Mistakes To Avoid In DIY Resin Driveway Installation
To have a successful DIY resin driveway, it’s vital to avoid certain blunders. Here are 3 tips to remember:
- Wrong surface prep: One of the most common errors is not properly preparing the surface before applying resin. This includes cleaning and getting rid of any litter or loose stuff. Without proper prep, the resin may not stick correctly and can cause trouble eventually.
- Bad mixing ratios: Another mistake to stay away from is using the wrong mixing ratios when getting ready the resin. It’s essential to follow the manufacturer’s instructions and make sure the resin and hardener are blended in the correct amounts. Not doing so can cause an inadequate cure or a weak finished driveway.
- Not enough curing time: Patience is important when curing a resin driveway. Hurrying can lead to premature cracking, discoloration, or uneven surfaces. It’s essential to provide sufficient time for each layer of resin to totally cure before adding succeeding coats or allowing vehicle traffic.
Moreover, picking good quality materials and tools can help a lot for your DIY resin driveway project.
Pro Tip: Do a small test patch in a hidden part of your driveway prior to starting the full installation. This will help you evaluate how well the resin sticks and cures on your particular surface, making sure optimal results for your entire driveway.
Conclusion
DIY resin driveways may not be the best choice for everyone. It can save money, but there are considerations. Skilled and experienced work is needed to ensure a smooth finish. The materials can be expensive. Hiring a professional contractor guarantees a high-quality result without the risk of errors.
Contractors have expertise and understand the installation process. They have the needed skills for the base, mixing, applying, and curing. Attempting without their skill may cause subpar outcomes or property damage.
Resin driveway materials can be costly. Professional contractors often get discounts from suppliers. Buying on your own can be expensive, and mistakes can lead to wasted materials.
Don’t miss out! Contact a professional contractor today. Let them do the specialized task with precision and expertise. Enjoy a flawless resin surface.