
Sick of seeing your dull, cracked driveway? Want to increase your home’s curb appeal? Look no further! Here, we’ll dive into the extraordinary world of DIY resin-bound driveways.
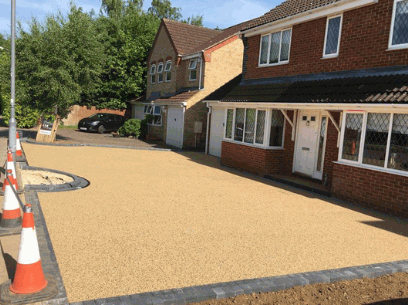
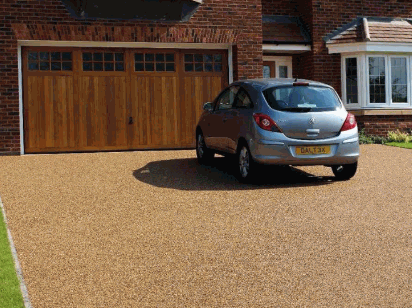
Resin-bound driveways are very popular now due to their strength, flexibility, and stunning beauty. They’re made by merging natural aggregates with resin, forming a flat, seamless surface that’s gorgeous and functional.
The best part of these driveways is that you can personalize them however you’d like. With lots of colors and aggregate options, you can craft a driveway that fits your home’s style. Whether you prefer traditional or modern, you’ll find endless possibilities.
Not only that, but resin-bound driveways give a number of practical advantages too. They have great drainage, so you won’t worry about water pooling during heavy rains. Plus, they don’t need much maintenance and won’t wear down from heavy traffic.
Don’t hesitate! Transform your entrance today and make a lasting first impression. Don’t miss out on increasing your property’s look while enjoying long-term durability. Take action and enjoy the beauty of DIY resin-bound driveways!
What Is A Resin-Bound Driveway?
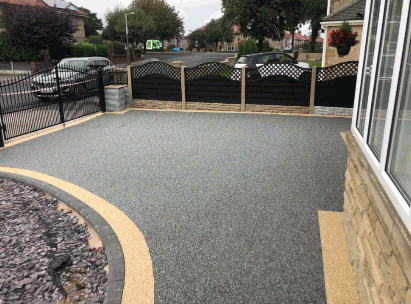
A resin-bound driveway is a trendy selection for those who want to add class and lastingness to their homes. This unique surfacing solution mixes resin with stones or gravel, for a flawless finish.
This blend of resin and stones allows for many design possibilities, from classic gravels to modern options such as glass chippings. Homeowners can find the look that matches their style and improves the attractiveness of their property.
In addition to its beauty, a resin-bound driveway has practical advantages. The even surface stops any loose stones or gravel, creating a secure area for pedestrians and vehicles. Moreover, the porous material lets water drain away, lessening flooding or ice build-up in colder months.
Maintenance is simple for a resin-bound driveway. With a bit of effort, you can keep it looking good for years. Cleaning with mild soap and power washing periodically should do the trick.
Pro Tip: Before doing a DIY resin-bound driveway job, follow all instructions from the makers to get the best results. Ask a pro for help if you’re not familiar with the process.
Benefits Of DIY Resin-Bound Driveways
DIY resin-bound driveways boast numerous advantages! Not only are they cost-effective, but they also provide superior durability and aesthetic appeal to your property. These driveways are low maintenance, customizable, long-lasting, and an eco-friendly option. Plus, they boast UV stability, protecting the driveway from fading in the sun.
It’s time to take action and enjoy these benefits! Transform your driveway into a stunning focal point and increase your home’s value. Start today and reap the rewards of a sustainable, long-lasting investment. Don’t miss out!
Materials And Tools Needed
Creating a DIY resin-bound driveway requires the right materials and tools. Quality products guarantee a smooth, long-lasting finish. Here’s a list of must-haves:
- Resin binder: The main component for strength and binding. Choose one suitable for outdoors.
- Aggregate: This provides texture and strength. Gravel or crushed stone work well.
- Mixing paddle: To blend resin binder and aggregate. Get a reliable one.
- Trowel: To spread and level the mixture. Look for one with a comfortable grip.
- Wheelbarrow or tub: For mixing. Make sure it’s big enough.
- Measuring equipment: Accurate measurements are key. Use measuring cups or buckets.
- Protective gear: Safety first! Wear gloves, goggles, and a mask.
Plus, a pressure washer or hose and access to water are helpful. Having the right materials and tools will help you create a lasting, beautiful feature that adds value to your property.
Resin has been used for centuries for mummification and preserving artifacts. Now we use it to make driveways that stand up to heavy traffic and bad weather. Let’s take advantage of this timeless durability and make stunning entrances to our homes.
Uncover more: Can You DIY Resin Driveway
Step-By-Step Guide On How To Prepare The Area For A Resin-Bound Driveway
A resin-bound driveway can enhance the aesthetics and durability of your home’s exterior. To prepare the area for this type of driveway, follow this step-by-step guide:
- Analyze the Surface:
- Check the current condition of your existing driveway or the area where you plan to install the resin-bound surface.
- Ensure that the surface is stable and free from cracks, potholes, or any other major damage.
- Clear away any vegetation, debris, or loose materials to create a clean and even base.
- Prepare the Substrate:
- Assess the substrate material underneath the surface of your driveway.
- Remove any loose or weak material to create a solid and stable foundation.
- Repair or reinforce the substrate as needed.
- If the substrate is permeable, it might require additional measures to improve water drainage.
- Apply a Binding Layer:
- Before applying the resin-bound mixture, a binding layer needs to be created.
- This layer helps to bond the resin to the substrate and provides added strength.
- Use a suitable binding material, such as an epoxy resin or a polyurethane resin, and apply it evenly over the prepared area.
- Allow the binding layer to cure properly before proceeding to the next steps.
Ensure a successful resin-bound driveway installation by following these steps. Remember to always consult professional guidance or refer to specific product instructions for best results.
A unique detail to consider is the importance of using the correct ratio of aggregate to resin. This ensures optimal strength and longevity of the resin-bound surface, preventing issues such as cracking or delamination.
According to a study by the British Board of Agrément, resin-bound driveways have an average lifespan of 25 years when properly installed and maintained, making them a durable and long-lasting option for homeowners.
Clearing the existing driveway: Prepare to say goodbye to your old cracked and worn-out driveway, because with these DIY resin-bound tips, it’s about to get a makeover that even Cinderella would envy.
Clearing The Existing Driveway
To prep for a resin-bound driveway, you must first clear the existing driveway. This is key for an even surface. Here’s a guide:
- Pick up any loose debris like leaves, dirt, and rocks.
- Use a power washer or hose to clean the entire area, removing any stains or grime.
- See if there are any cracks or damage; fix them before installing the resin.
- Pull out any weeds or vegetation by hand or with weed killer.
- Sweep away remaining dirt or debris.
- Cut back any overhanging grass or foliage at the edges.
Each driveway may have unique needs based on material and condition. Talk to pros who specialize in resin-bound installations. Prep plays a big role in longevity and quality. It’ll create a solid foundation for the resin-bound application.
As this example shows, prepping the existing driveway is essential to awesome results and a better driveway experience.
Leveling The Ground
- Start by removing any debris or vegetation that could hinder the leveling process. This includes rocks, weeds, and roots.
- Dig out any uneven patches of soil with a shovel or excavator. This will create an even surface for the driveway.
- Compact the ground with a compactor or tamper, which will provide a solid foundation for your resin-bound driveway.
- To enhance the leveling, add a layer of crushed stone or hardcore material. This will improve stability and drainage.
- Before continuing with the installation, check and re-level the ground to make sure it is flat and even.
- Don’t forget to wear safety gear! Gloves and protective eyewear are musts while leveling the ground for your resin-bound driveway.
- Follow these steps to achieve a beautiful and long-lasting driveway that will upgrade your property.
Applying A Weed Barrier
A weed barrier’s job is to protect the resin-bound layer from pesky vegetation.
Clear the area of all existing weeds and plants before applying.
Make sure the weed barrier is spread evenly over the whole surface, with no gaps or overlaps.
For even more effective protection, overlap the edges by at least 6 inches.
For best results, consult an expert specializing in resin-bound driveways.
Installing Edge Restraints
- Excavate the spot for the restraints. Ensure it’s deep enough to fit both the base and restraint.
- Lay a concrete foundation along the edges. This must be level and smooth.
- Place the chosen edge restraint material (metal or concrete) against the concrete foundation. It must be secure and aligned.
- Choose an edge restraint that fits the desired aesthetic and functional requirements.
- Secure any overlapping sections of the restraint.
- Allow time for curing if using concrete edging before other steps.
- Consult with professionals or follow manufacturer guidelines for specific recommendations.
Pro Tip: Proper installation of edge restraints is essential for a beautiful and durable driveway. It will enhance the aesthetics of your property.
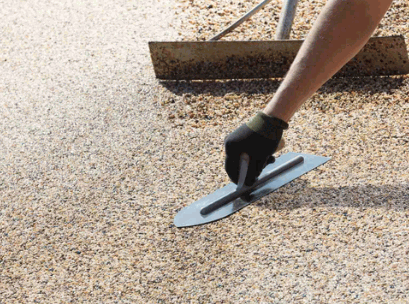
Mixing And Applying The Resin
When it comes to mixing and applying the resin for your DIY resin-bound driveway, there are a few important steps to follow. Here’s a simple 4-step guide to help you get started:
- Measure and Prepare: Begin by carefully measuring the resin and hardener according to the manufacturer’s instructions. It’s crucial to get the ratio right for the mixture to properly cure. Once measured, combine the resin and hardener in a clean container and stir thoroughly.
- Add the Aggregate: Gradually add the aggregate to the resin and hardener mixture while continuously mixing. Make sure to evenly distribute the aggregate throughout the mixture to ensure a consistent result. Continue to stir until all the aggregate is fully coated with resin.
- Test and Adjust: To ensure the mixture is suitable for application, perform a small test patch. Apply a small amount of the mixture to a spare surface and observe how it cures. If the consistency and finish are satisfactory, you can proceed with the application. If adjustments are required, add more resin or aggregate as needed.
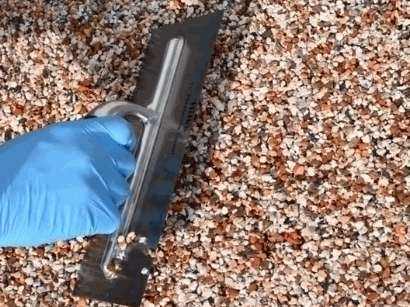
- Apply the Resin Bound Mixture: Using a trowel or specially designed roller, apply the resin-bound mixture evenly onto the prepared surface. Work in small sections, ensuring a smooth and level finish. Take care to avoid overlapping coats, as this can lead to uneven curing and appearance. Allow the driveway to cure fully according to the manufacturer’s instructions before use.
Pro Tip: Prioritize safety by wearing protective clothing, gloves, and eyewear when handling the resin and during the application process.
Remember, mastering the process of mixing and applying the resin is crucial for achieving a professional and durable resin-bound driveway. Follow these steps carefully and enjoy the satisfaction of creating your own beautiful driveway.
Get your math skills ready, because it’s time to calculate the resin needed for your dream driveway – but don’t worry, we won’t judge if you need a calculator for basic arithmetic.
Calculating The Amount Of Resin Needed
- Use a tape measure to get the length and width of the surface where the resin will be applied.
- Multiply the area by the thickness to calculate the volume in cubic units.
- Factor in extra resin for spills, uneven application, or any unforeseen circumstances.
- If multiple layers, multiply the volume by the number of layers.
- Get slightly more than calculated to ensure enough material.
- Calculations are only an estimate.
- Consider working with a professional or consulting resources for specific guidelines for the project size, type of resin, and environmental factors.
- It’s been essential to calculate resin amount for woodworking, art, and crafts.
- Proper estimation saves resources and ensures a smooth workflow.
Mixing The Resin And Aggregates
- Measure the resin accurately with a scale or cup.
- Next, add the aggregates to it gradually.
- Mix using a paddle or machine until they are distributed evenly.
- Monitor the consistency of the mixture, which should not be too thick or runny.
- To get optimal results, use clean equipment, mix small batches, and do a test patch before applying.
- Follow the manufacturer’s instructions for the best results.
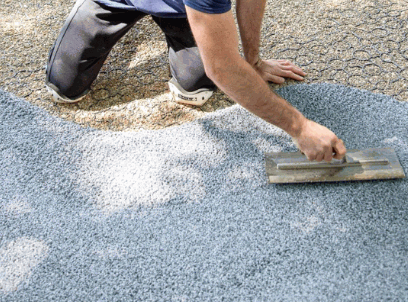
Applying The Resin-Bound Mixture
- Prep the area: Ensure it is clean and free of clutter. Priming will help the resin stick.
- Mix: Follow the instructions for blending the resin and aggregate. All must be blended well.
- Spread: Put the mixture onto the surface and spread with a trowel or squeegee. One section at a time, keep the thickness consistent.
- Finish: Use a roller or float to make the surface smooth. Take note of edges and corners. To make sure it is long-lasting, apply properly.
- Time: Work quickly; the mixture will start to set. Have all tools ready.
- Weather: Do it on a dry, mild day. High humidity or heat can cause an uneven finish.
- Clean: Clean spills right away with warm soapy water. This will stop marks on the new surface.
Follow these tips and you can apply the resin-bound mixture with confidence. It will create a beautiful and durable surface.
Finishing Touches And Maintenance
Maintaining your resin-bound driveway is essential for its longevity and aesthetic appeal. To ensure its upkeep, consider the following points:
- Regular sweeping: Remove debris, leaves, and dirt from the surface using a stiff broom or brush. This prevents the accumulation of unwanted substances and maintains the driveway’s appearance.
- Stain prevention: Attend to spills immediately to prevent stains. Avoid using harsh chemicals or abrasive cleaning tools that may damage the resin bond. Instead, use warm soapy water and a soft cloth to clean any spills.
- Weed control: Keep the driveway weed-free by regularly inspecting and removing any growth. A weed suppressant membrane can be installed during the driveway’s construction to minimize weed growth.
- Repairs and resealing: Periodically inspect the driveway for any cracks, chips, or damaged areas. If necessary, repair these issues promptly to prevent further damage. Resealing the surface every few years can also help maintain its durability and appearance.
It’s important to note that proper maintenance practices may vary depending on the specific resin-bound system used. Always refer to the manufacturer’s guidelines for the best results.
Resin-bound driveways offer a low-maintenance solution with excellent durability and aesthetic appeal. As a true fact, research conducted by the Resin Bound Surfacing Association (RBSA) has shown that properly installed resin-bound driveways can last up to 25 years with the right care and maintenance.
If you thought giving compliments was the best way to smooth things over, wait till you try resurfacing a DIY resin-bound driveway.
Smoothing The Surface
Is construction work done? Great! Now, it’s time to focus on the finishing touches.
Sandpaper or a sanding machine smoothens out rough patches and creates a seamless look. Primer helps even out the surface for a better topcoat. Fill in cracks and holes with putty and filler for an even texture.
Clean and prepare the surface first. Maintenance is key too – regular cleaning with suitable agents and techniques.
Follow these suggestions to enhance the appearance and ensure the long-term durability of your surfaces.
Curing And Drying Time
The curing and drying time for materials varies. Here’s an overview of estimates for popular materials:
| Material | Curing Time | Drying Time |
|---|---|---|
| Concrete | 7-28 days | 24-48 hours |
| Paint | 2-4 hours | 1 hour |
| Wood finish | 24-48 hours | 4-6 hours |
Temperature and humidity can influence these times. Make sure to follow product instructions for best results.
Ventilation is key too. It helps avoid damage or flaws in the finish. If you take time to properly cure and dry, you’ll get a quality outcome.
Don’t rush it! Not curing and drying enough can lead to weakened durability and a poor-looking finish. Invest the time for a long-lasting, top-notch result.
Regular Maintenance Tips
Cleanliness is a top priority! Dust, vacuum and wipe surfaces regularly to keep things looking good and avoid damage. Check for wear and tear, such as on furniture or vehicles, and repair or replace anything that’s damaged.
Fluids and lubrication are important too. Keep your vehicle fluids topped up and properly lubricate hinges and moving parts.
Regular inspections are also a good idea. Check the structure of your home or appliances for any potential problems.
Each item may need specific maintenance so read user manuals or consult professionals when needed.
Regular maintenance means long-lasting possessions and fewer costly replacements. Embrace these practices now and be worry-free tomorrow!
Conclusion
A DIY resin-bound driveway can be rewarding and cost-effective. With the right steps, you can give your driveway a durable and attractive look.
- First, prepare the surface – clear it off and make sure it’s flat.
- Next, mix the binder and aggregate in the correct proportions. Make sure the mix is consistent.
- Apply the mixture using trowels or squeegees and use edging tools to create neat edges.
- Let it cure for 24-48 hours. Avoid foot traffic or vehicle movement while it’s drying.
- To keep it looking good, clean and rinse it regularly.
- Reseal it periodically to preserve its strength.