
Have you ever considered using epoxy flooring in your garage? Epoxy flooring is a durable, low-maintenance solution that provides both protection and aesthetics to your garage floor.
In this article, we will discuss the benefits of using epoxy flooring, the steps involved in the application process, and the tools and materials needed to complete the project.
Whether you are looking to enhance the durability of your garage floor or simply update its appearance, epoxy flooring may be the perfect solution for you.

What Is Epoxy Flooring?
Epoxy flooring is a type of surface coating that combines epoxy resin with a polyamine hardener to create a durable, smooth, and seamless finish for floors.
Epoxy flooring is known for its exceptional durability, making it resistant to chemicals, stains, and abrasions. This makes it an ideal choice for high-traffic areas like garages, warehouses, and industrial facilities. Its seamless finish not only provides a sleek appearance but also offers easy maintenance and cleaning.
Due to its versatility, epoxy flooring can be customized with a wide range of colors, textures, and patterns, allowing for endless design possibilities. This makes it a popular choice not only for industrial settings but also for commercial spaces seeking a modern and durable flooring solution.
Why Use Epoxy Flooring In Garage?
Epoxy flooring is a popular choice for garages due to its durability, easy maintenance, chemical resistance, and aesthetic appeal.
One of the primary reasons homeowners opt for epoxy flooring in their garages is its ability to resist stains, scratches, and harsh chemicals, making it ideal for high-traffic areas like garages. This type of flooring provides a seamless and smooth surface that is easy to clean, maintaining a neat and professional look with minimal effort.
Along with its practical benefits, epoxy flooring comes in a wide range of colors and finishes, allowing homeowners to customize their garage floor to match their personal style and enhance the overall look of the space. Whether it’s a vibrant pop of color or a sleek, modern design, epoxy flooring can transform a dull garage into a visually appealing area that complements the rest of the home.
Durability
One of the key advantages of epoxy flooring is its exceptional durability, making it a long-lasting solution for high-traffic areas like garages.
Epoxy flooring is renowned for its resistance to wear, impacts, and chemical exposure, making it a top choice for industrial and commercial environments. This type of flooring can withstand heavy foot traffic, vehicular movement, and even machinery without losing its structural integrity.
Its seamless and non-porous surface also provides protection against spills, stains, and moisture, ensuring a pristine appearance even with continuous use. Epoxy coatings can be customized with anti-slip additives to enhance safety in hazardous areas.
Easy Maintenance
Epoxy flooring in garages is easy to maintain, requiring simple cleaning routines to keep the surface looking fresh and new.
Regular maintenance of epoxy flooring not only enhances its aesthetic appeal but also prolongs its durability. Simple routine cleaning involves sweeping or vacuuming to remove debris and dirt particles that can scratch the surface. Mopping with a gentle cleanser is effective in removing stubborn stains while maintaining the shine of the floor. For tougher stains, a mixture of water and vinegar can be utilized. To prevent damage, it is advisable to avoid harsh chemicals and abrasive cleaners that can deteriorate the epoxy finish. By following these maintenance practices, you can enjoy a pristine garage floor for years to come.
Chemical Resistance
Epoxy flooring offers excellent chemical resistance, protecting the garage floor from spills, stains, and damage caused by automotive fluids or cleaning solutions.
With its robust chemical-resistant properties, epoxy flooring acts as a shield against corrosive substances that often plague garage environments. This feature is crucial for maintaining the integrity of the floor, ensuring it remains unscathed even when exposed to oil, gasoline, grease, or other harsh chemicals. The durability and performance of epoxy flooring make it a popular choice among homeowners and businesses looking for a long-lasting solution that can withstand the rigors of daily use.
Aesthetics
Along with its practical benefits, epoxy flooring enhances the visual appeal of the garage, offering a range of colors, patterns, and design options to customize the space.
In terms of design possibilities, epoxy flooring opens up a world of creativity. From sleek, solid colors to intricate patterns and textures, the choices are abundant. Whether you prefer a modern, glossy finish or a rustic, matte look, epoxy coatings can be tailored to suit your aesthetic preferences.
Color choices play a significant role in transforming a plain garage into a vibrant space. With epoxy flooring, you can opt for bold, bright hues to make a statement or subtle, neutral tones for a more understated elegance. The versatility in color selection allows you to set the mood and complement the overall style of your home.
Adding decorative elements like color chips and flakes to the epoxy coating can elevate the design further. These elements not only provide visual interest but also create a unique, textured surface that enhances the grip and durability of the floor. From metallic flakes for a modern touch to natural stone chips for a more organic feel, the options are endless for a truly personalized finish.
What Are The Steps To Do Epoxy Flooring In Garage?
To install epoxy flooring in a garage, several key steps must be followed meticulously to ensure a successful DIY project that results in a professional finish.
First, start by prepping the garage floor thoroughly by sweeping, vacuuming, and degreasing to remove any dirt, grease, or oil. Proper floor preparation is crucial for the adhesion of the epoxy.
- Next, inspect the floor for any cracks or imperfections; if needed, make the necessary repairs using a concrete patch.
- After repairs, apply a concrete etching solution to ensure the surface is properly roughened for the epoxy to bond effectively.
Once the cleaning and repairs are completed, apply a quality primer to the floor to further enhance adhesion. Mix the epoxy resin and hardener according to the manufacturer’s instructions, ensuring a thorough and even blend. Use a roller or squeegee to apply the epoxy coating evenly across the floor, working in small sections to avoid drying before blending.
Preparing The Floor
Before applying an epoxy coating, thorough floor preparation is essential to ensure proper adhesion and a smooth finish.
This process typically involves several steps to ensure the surface is ready for the epoxy application. The floor must be thoroughly cleaned to remove any dirt, dust, or debris. Next, it’s important to degrease the surface to eliminate any oils or greasy residues that could affect the adhesion of the epoxy. Etching the floor is also crucial to creating a textured surface that promotes better bonding.
Additionally, repairing any cracks or damages in the floor is necessary to prevent them from worsening underneath the epoxy layer. It is vital to make sure the floor is completely dry and free from contaminants before applying the epoxy to achieve the best results.
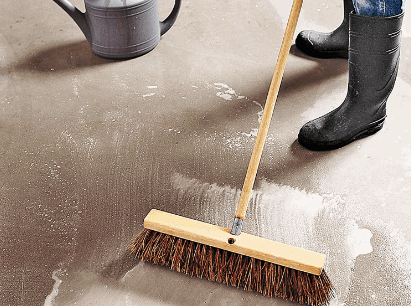
Cleaning The Floor
Cleaning the garage floor is a crucial step to remove dirt, dust, oil, and other contaminants that could interfere with the epoxy adhesion.
Thorough cleaning is essential as it paves the way for a successful application of epoxy. Start by sweeping the floor to eliminate loose debris, followed by scrubbing using a concrete cleaner that targets stubborn stains and grease patches. Pay close attention to corners and edges where grime tends to accumulate.
Next, degreasing the surface is paramount to ensure the epoxy adheres properly. Utilize a degreaser specifically formulated for garage floors to eliminate any lingering oil or grease residues. Make sure to rinse the floor thoroughly to remove all cleaning residue.
After cleaning and degreasing, allow the floor to dry completely before applying the epoxy. Moisture can hinder the bonding process, so ensure the surface is not only visibly dry but also devoid of any hidden pockets of water.
Learn more: How To Clean Epoxy Resin Floor
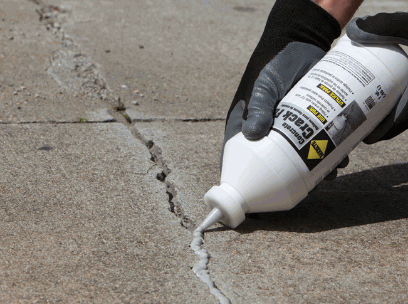
Repairing Any Damages
Addressing any existing damages, cracks, or imperfections in the garage floor is crucial before applying the epoxy coating to prevent them from affecting the final finish.
Identifying these issues requires careful inspection. For cracks, consider using a concrete crack filler to seal them properly. For spalling, remove any loose concrete and apply a bonding agent before patching with a concrete patch mix. Pitting can be filled with a repair mortar to level the surface. Once repairs are done, it is essential to clean the floor thoroughly to remove any dirt or grease that could interfere with adhesion. Following these steps will ensure a solid base for the epoxy application, guaranteeing a durable and attractive garage floor.
Applying The Primer
Priming the garage floor with an epoxy primer is essential to promote adhesion and ensure the longevity of the epoxy coating.
An epoxy primer serves as a crucial preparatory layer that creates a strong bond between the concrete substrate and the subsequent epoxy application. The choice of primer depends on factors such as the porosity of the concrete and the type of epoxy coating being used.
Applying the primer correctly is key to its effectiveness. It typically involves cleaning the floor thoroughly, allowing it to dry completely, and then evenly applying the primer using a roller or brush.
This initial step not only improves adhesion but also helps prevent issues like bubbles or fish eyes in the final epoxy finish. Priming the surface ensures that the epoxy coating adheres uniformly and lasts longer, providing a durable and attractive floor finish.
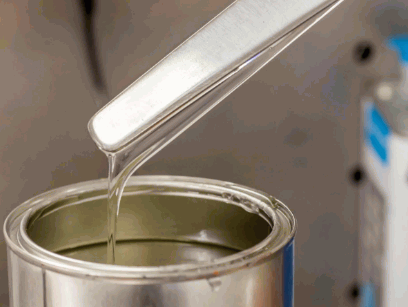
Mixing The Epoxy Coating
Properly mixing the epoxy resin and hardener is crucial to activate the curing process and achieve the desired properties of the epoxy coating.
When combining the epoxy resin and hardener, always refer to the manufacturer’s instructions for the specific mixing ratio. Typically, a ratio of resin to hardener is specified, such as 1:1 or 2:1. Use measuring cups or syringes to accurately measure out the components. Next, pour the measured amounts into a clean mixing container.
It is essential to mix the components thoroughly to ensure a complete and even blend. Use a stirring stick or paddle to stir the resin and hardener together. Make sure to scrape the sides and bottom of the container to incorporate all the material.
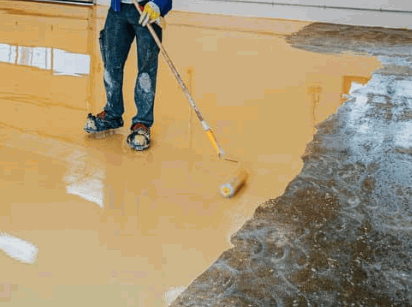
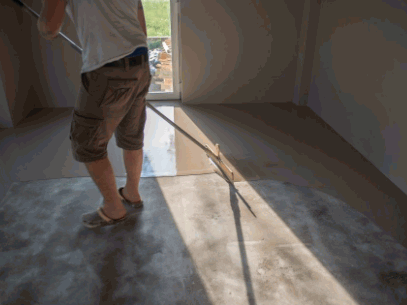
Applying The Epoxy Coating
The application of the epoxy coating should be done methodically, using a roller or squeegee to ensure even coverage and a smooth finish across the garage floor.
Surface preparation is crucial before applying the epoxy coating. Make sure the garage floor is clean, dry, and free of any oil or grease stains. Fill any cracks or imperfections with a suitable filler and allow it to dry completely. Proper preparation enhances the adhesion of the epoxy to the surface, improving its durability.
When applying the epoxy, start from one corner and work your way toward the exit. Use the roller or squeegee in long, overlapping strokes to prevent patchiness and ensure consistent thickness. Follow the manufacturer’s instructions for mixing the epoxy resin and hardener to achieve the correct chemical reaction.
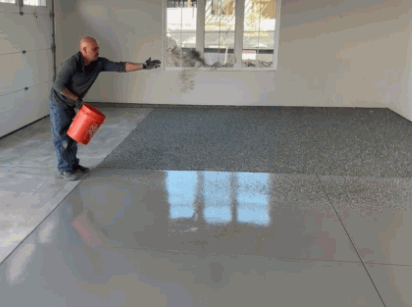
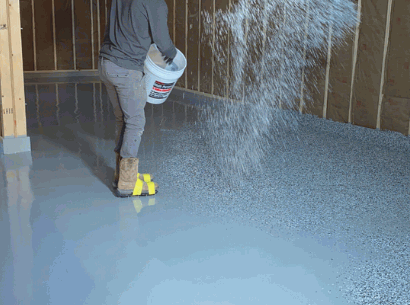
Adding Decorative Chips (Optional)
For added customization and texture, decorative color chips can be scattered over the wet epoxy coating, creating a unique and visually appealing floor finish.
Decorative chips not only add an element of personalization to the garage floor but also provide a practical benefit by enhancing traction and durability. These chips come in a variety of colors and sizes, allowing homeowners to choose the perfect combination to complement their space. Design options range from subtle accents to bold statements, catering to different aesthetic preferences.
In terms of application, the process involves broadcasting the chips onto the epoxy-coated surface while it is still wet. This ensures proper adhesion and a seamless integration of the chips into the coating. Following this step, a sealing technique is employed to lock the chips in place and protect the floor from wear and tear over time.
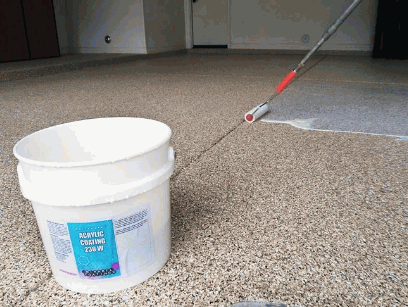
Applying A Topcoat
Applying a topcoat over the cured epoxy layer adds an extra layer of protection and durability, enhancing the overall resilience of the garage floor.
The topcoat acts as a shield, safeguarding the underlying epoxy from scratches, chemical spills, and UV rays, prolonging the flooring’s lifespan. Topcoats come in various formulations such as polyurethane, epoxy, and acrylic, each offering specific advantages. Polyurethane topcoats provide exceptional durability and resistance to abrasion, ideal for high-traffic areas. Epoxy topcoats offer superior adhesion and chemical resistance, perfect for industrial settings. Acrylic topcoats provide a glossy finish and are quick to dry, suitable for residential use.
Letting The Floor Cure
After the application of the epoxy coating and topcoat, it is essential to allow sufficient curing time for the floor to fully harden and develop its maximum strength.
Proper curing conditions play a vital role in ensuring the longevity and durability of the epoxy flooring. The ideal curing temperature for epoxy is typically between 60-90°F, with humidity levels around 40-60%. Humidity control is crucial to prevent bubbling or hazing during the curing process.
Allow the floor to cure undisturbed for at least 72 hours, though some epoxies may require longer curing times based on specific formulations. Once fully cured, maintain the finish by regularly cleaning it with mild soap and water to preserve its luster and protective qualities.
What Are The Tools And Materials Needed For Epoxy Flooring?
To undertake an epoxy flooring project in a garage, one will need essential tools and materials such as a floor grinder, epoxy coating kit, cleaning supplies, paint roller, and protective gear.
When preparing for an epoxy flooring installation, having a high-quality floor grinder is crucial for properly prepping the surface by grinding and leveling the concrete. Look for trusted brands like Bosch or DeWalt for reliability and performance. The epoxy coating kit, which typically includes resin and hardener, is essential for creating that durable, glossy finish.
Complement your tools with reliable cleaning supplies to ensure the surface is spotless before applying the epoxy. A simple yet effective paint roller will help you evenly spread the epoxy coating, creating a seamless finish.
Remember to prioritize safety by wearing protective gear such as gloves, goggles, and a mask to shield yourself from the fumes and chemicals involved in the process.
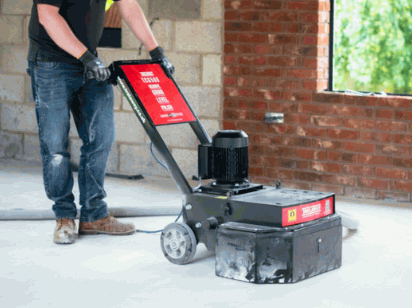
Floor Grinder
A floor grinder is a key tool for preparing the concrete surface by removing existing coatings, adhesives, or imperfections to create a clean and level base for the epoxy application.
Using a floor grinder in the epoxy flooring process entails a meticulous approach to ensure the concrete is perfectly prepped. The grinder’s abrasive discs or diamond blades work to grind and polish the surface methodically, eliminating any rough patches or uneven spots. This process not only enhances the concrete’s smoothness but also promotes adhesion for the epoxy coating to adhere properly. By properly grinding the surface, you not only ensure a strong bond between the epoxy and the concrete but also contribute to the longevity and durability of the final flooring finish.
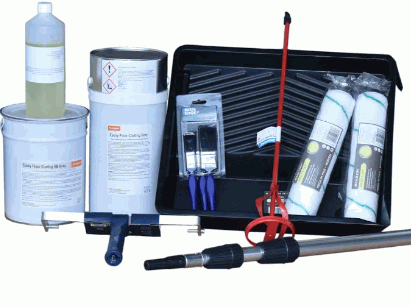
Epoxy Coating Kit
An epoxy coating kit contains all the necessary components, including epoxy resin, hardener, color pigments, and instructions, required for applying a seamless epoxy finish on the garage floor.
Epoxy coating kits come in a variety of formulations to cater to different needs; some are designed for high-traffic areas, providing extra durability, while others offer UV resistance for outdoor applications. These kits often include tools like mixing sticks, rollers, and brushes, ensuring that you have everything needed for a successful application. With clear step-by-step instructions, even beginners can achieve a professional-looking result. The convenience and completeness of these kits make them a popular choice for those tackling DIY epoxy flooring projects.
Cleaning Supplies
Cleaning supplies such as degreasers, etching solutions, and scrubbing tools are essential for preparing the garage floor surface before applying the epoxy coating.
Degreasers play a crucial role in removing oil, grease, and other contaminants that could hinder the adhesion of the epoxy. They help in thoroughly cleaning the surface, ensuring a smooth and even application.
Etching solutions are necessary to create a rough profile on the floor, allowing the epoxy to adhere properly. They also help in opening up the pores of the concrete, promoting better bonding.
In terms of scrubbing tools, stiff bristle brushes or sanding disks are commonly used to effectively clean and roughen the surface. It’s important to clean the floor multiple times to remove all debris and chemicals, ensuring the epoxy can bond securely.
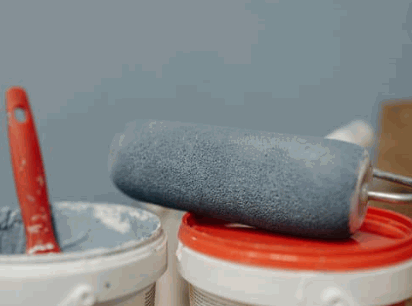
Paint Roller
A paint roller is a versatile tool used for applying the epoxy coating evenly across the garage floor, ensuring uniform coverage and a smooth finish.
In terms of epoxy flooring projects, the type of paint roller you choose plays a significant role in the outcome. Choosing the right roller ensures that the epoxy is applied effectively, without leaving behind marks or streaks.
There are different roller types available, such as nap rollers and foam rollers, each serving a specific purpose in the application process. While nap rollers are ideal for textured surfaces, foam rollers work well for smooth finishes.
To achieve professional results, proper application techniques like maintaining consistent pressure, overlapping strokes, and working in small sections are crucial.
Regular cleaning and maintenance of the roller after each use is essential to prolong its lifespan and ensure optimal performance in future projects.
Protective Gear
Wearing protective gear such as work gloves, eye protection, and appropriate clothing is essential to safeguard against exposure to epoxy chemicals and ensure personal safety during the flooring application.
Respirators or masks should be worn to prevent inhalation of harmful fumes that are released during the epoxy application process. It is crucial to choose the right type of respirator based on the specific chemicals present in the epoxy products being used.
Sturdy footwear with slip-resistant soles is essential to prevent accidental slips and falls on potentially slippery epoxy surfaces. The use of knee pads can also help protect against knee strain and discomfort during extended periods of working on the floor.