
Ready to start plastering skim a wall? Here’s what you need to know.
Firstly, prep the wall. That means taking off any loose paint or wallpaper, cleaning it, and fixing any cracks or holes. A solid base will make plaster adhere better and create a more even surface.
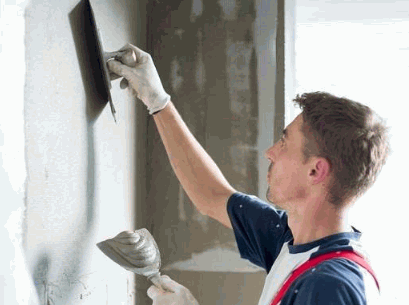
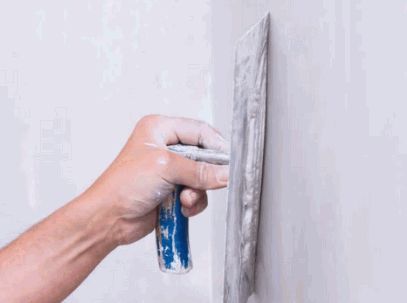
Mix your plaster to the instructions. It should be creamy and easy to spread, but not too runny. Use a trowel to spread it out in smooth, sweeping motions from top to bottom.
Check for imperfections or air bubbles. Smooth them out with your trowel, or lightly tap with a float to free trapped air. This will ensure a perfect finish.
Now, a bit about the history. Plastering walls has been done since ancient Egypt. Craftsmen would make gypsum-based plasters, decorated with artwork. Over time, different materials and methods have been used, but the goal has stayed the same – a perfectly smooth surface.
To master plastering skim a wall, practice is key. Patience, attention to detail, and lots of experience are all needed. Get your trowel and start transforming walls into masterpieces!
Gathering Materials And Tools
Gather your materials and tools – a plastering trowel, bucket, plastering hawk, mixing paddle, sandpaper, dust sheets, and protective equipment like goggles and gloves – so you can proceed with confidence. Think about the size and shape of the trowel based on your skill level and desired finish. Choose high-quality sandpaper for better results.
Now, take action! Don’t wait to gather everything you need. Otherwise, you might find yourself delayed or having to interrupt your project. Be prepared from the start. Get ready to give your walls a flawless skim coat!
Preparing The Wall
For a smooth plaster skim on a wall, the surface must be prepped. Here’s how:
- Check the wall for cracks, holes, and peeling paint. Use a scraper and fill any gaps with a suitable filler. Sandpaper the filled areas to make it even.
- Clean the wall using a mild detergent and warm water. Rinse with clean water and let dry.
- Apply a primer coat to enhance the adhesion of the plaster. Use a brush or roller to evenly cover the entire wall.
- Make sure the room is well-ventilated. Open windows or use fans for air circulation.
Protection is also important. Wear goggles, gloves, and a mask when handling chemicals.
By following these steps, you can lay the foundation for a perfect plaster skim. Now, let’s move on to the next step!
Mixing The Plaster Skim
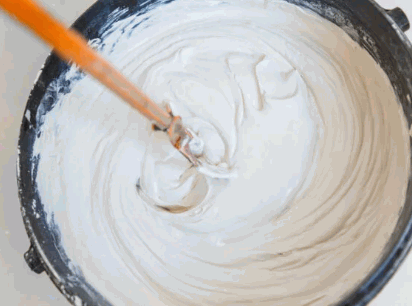
Mixing plaster skim is key for a polished finish. Follow these steps to get it just right.
- Gather the materials: bucket, measuring jug, plaster powder, water, and a stirring stick.
- Measure the powder. Be precise.
- Gradually add water while stirring. Don’t dump it all at once.
- Test the mixture by running a finger through it. It should be creamy and leave a clean line. Adjust if too thick or too thin.
- Mix it up for 1-2 minutes more to get out any lumps or air bubbles.
- Safety matters: mask and eyewear to avoid inhaling dust. Clean tools after use.
- With focus and detail, you can easily master plaster mixing!
Applying The Plaster Skim
When it comes to plaster skim, there are certain steps to take. Here’s a guide to get you started:
| Steps | Instructions |
|---|---|
| 1. Get Ready | When the base coat is dry but tacky, use a damp sponge or wet brush to even out ridges or bumps. Don’t overwork as it can cause cracks. |
| 2. Mix | In a container, use a 2:1 ratio of plaster to water. Blend with a paddle mixer or drill with a mixing attachment until creamy. |
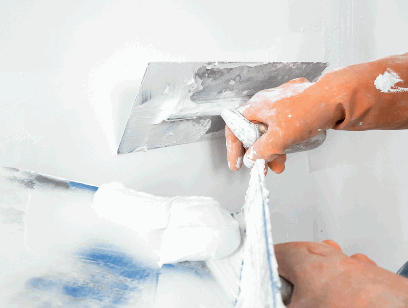
| 3. Base Coat | Use a steel trowel to spread a thin layer over the wall. Hawk and trowel for small areas. Long strokes for bigger spots. |
| 4. Smooth Out | Mix a thicker batch of plaster (less water). Spread an even layer with a trowel from top to bottom. |
| 5. Skim Coat | Smooth out any imperfections with trowel. Keep the trowel angled. Let dry before painting or wallpapering. |
| 6. Final Touches | Smooth out any imperfections with a trowel. Keep the trowel angled. Let dry before painting or wallpapering. |
Tools and techniques make all the difference! Tips:
- Use a stainless steel trowel.
- Keep thickness consistent.
- Multiple thin coats work best.
- Don’t over sand.
- Clean tools afterward.
By following these steps, you can get a professional finish. Take your time, stay patient, and practice before tackling bigger projects!
Check out: How To Fit Plaster Ceiling Rose
Drying And Sanding The Plaster Skim
- After the plaster skim is on the wall, it must be dried and sanded for a perfect finish. Here’s a guide on how to do it right:
- Allow enough drying time. Temperature and humidity can affect this. Don’t hurry – sanding too soon will ruin things.
- Check for bumps or ridges. Mark these with a pencil or tape to spot when sanding.
- Start sanding with medium-grit paper (around 120 grit). Do this in circles or back and forth for even sanding.
- Use fine-grit sandpaper (around 220 grit) for a smoother finish. Keep sanding until the surface feels silky.
- Dust off and clean up. Use a brush or vacuum attachment, then wipe with a damp cloth or sponge.
- Wear protective gear, such as goggles and a dust mask, to prevent particles from entering the eyes and lungs.
- To check the finish – run your hand lightly over the plaster skim. If it feels consistent, you’ve done it right!
Finishing Touches
To reach the perfect finish in plastering, pay attention to the fine details. These can make all the difference for a smooth result. Here’s a step-by-step guide:
| 1. Sand with fine-grit sandpaper. This will even out imperfections and prepare the wall for painting or wallpapering. |
| 2. Clean with a cloth or sponge to remove dust and debris. |
| 3. Apply primer to help paint or wallpaper adhere and to give a professional look. This is especially important for darker colors or repaired areas. |
| 4. Fill any cracks or indentations with filler, smoothing it out with a putty knife. Let it dry before continuing. |
| 5. Sand down the filler until it blends with the wall. Be careful not to damage surrounding areas. |
| 6. Do a final inspection. Make any touch-ups before adding the desired finish. |
The art of finishing touches in plastering needs patience, accuracy, and a keen eye for detail. By following these steps and taking the time to achieve a flawless surface, you can get a polished, refined look.
Conclusion
Plastering skim on a wall? It’s do-able! Follow the steps and use the right tools to get a smooth surface. Layer the plaster and let each one dry before applying the next.
For a professional look, pay attention to details and take your time. Make sure to protect the surrounding area from mess, too!
So, go ahead and give it a try. With the right attitude, you can master this art!